Caching & Revalidate: ServerSide vs ClientSide
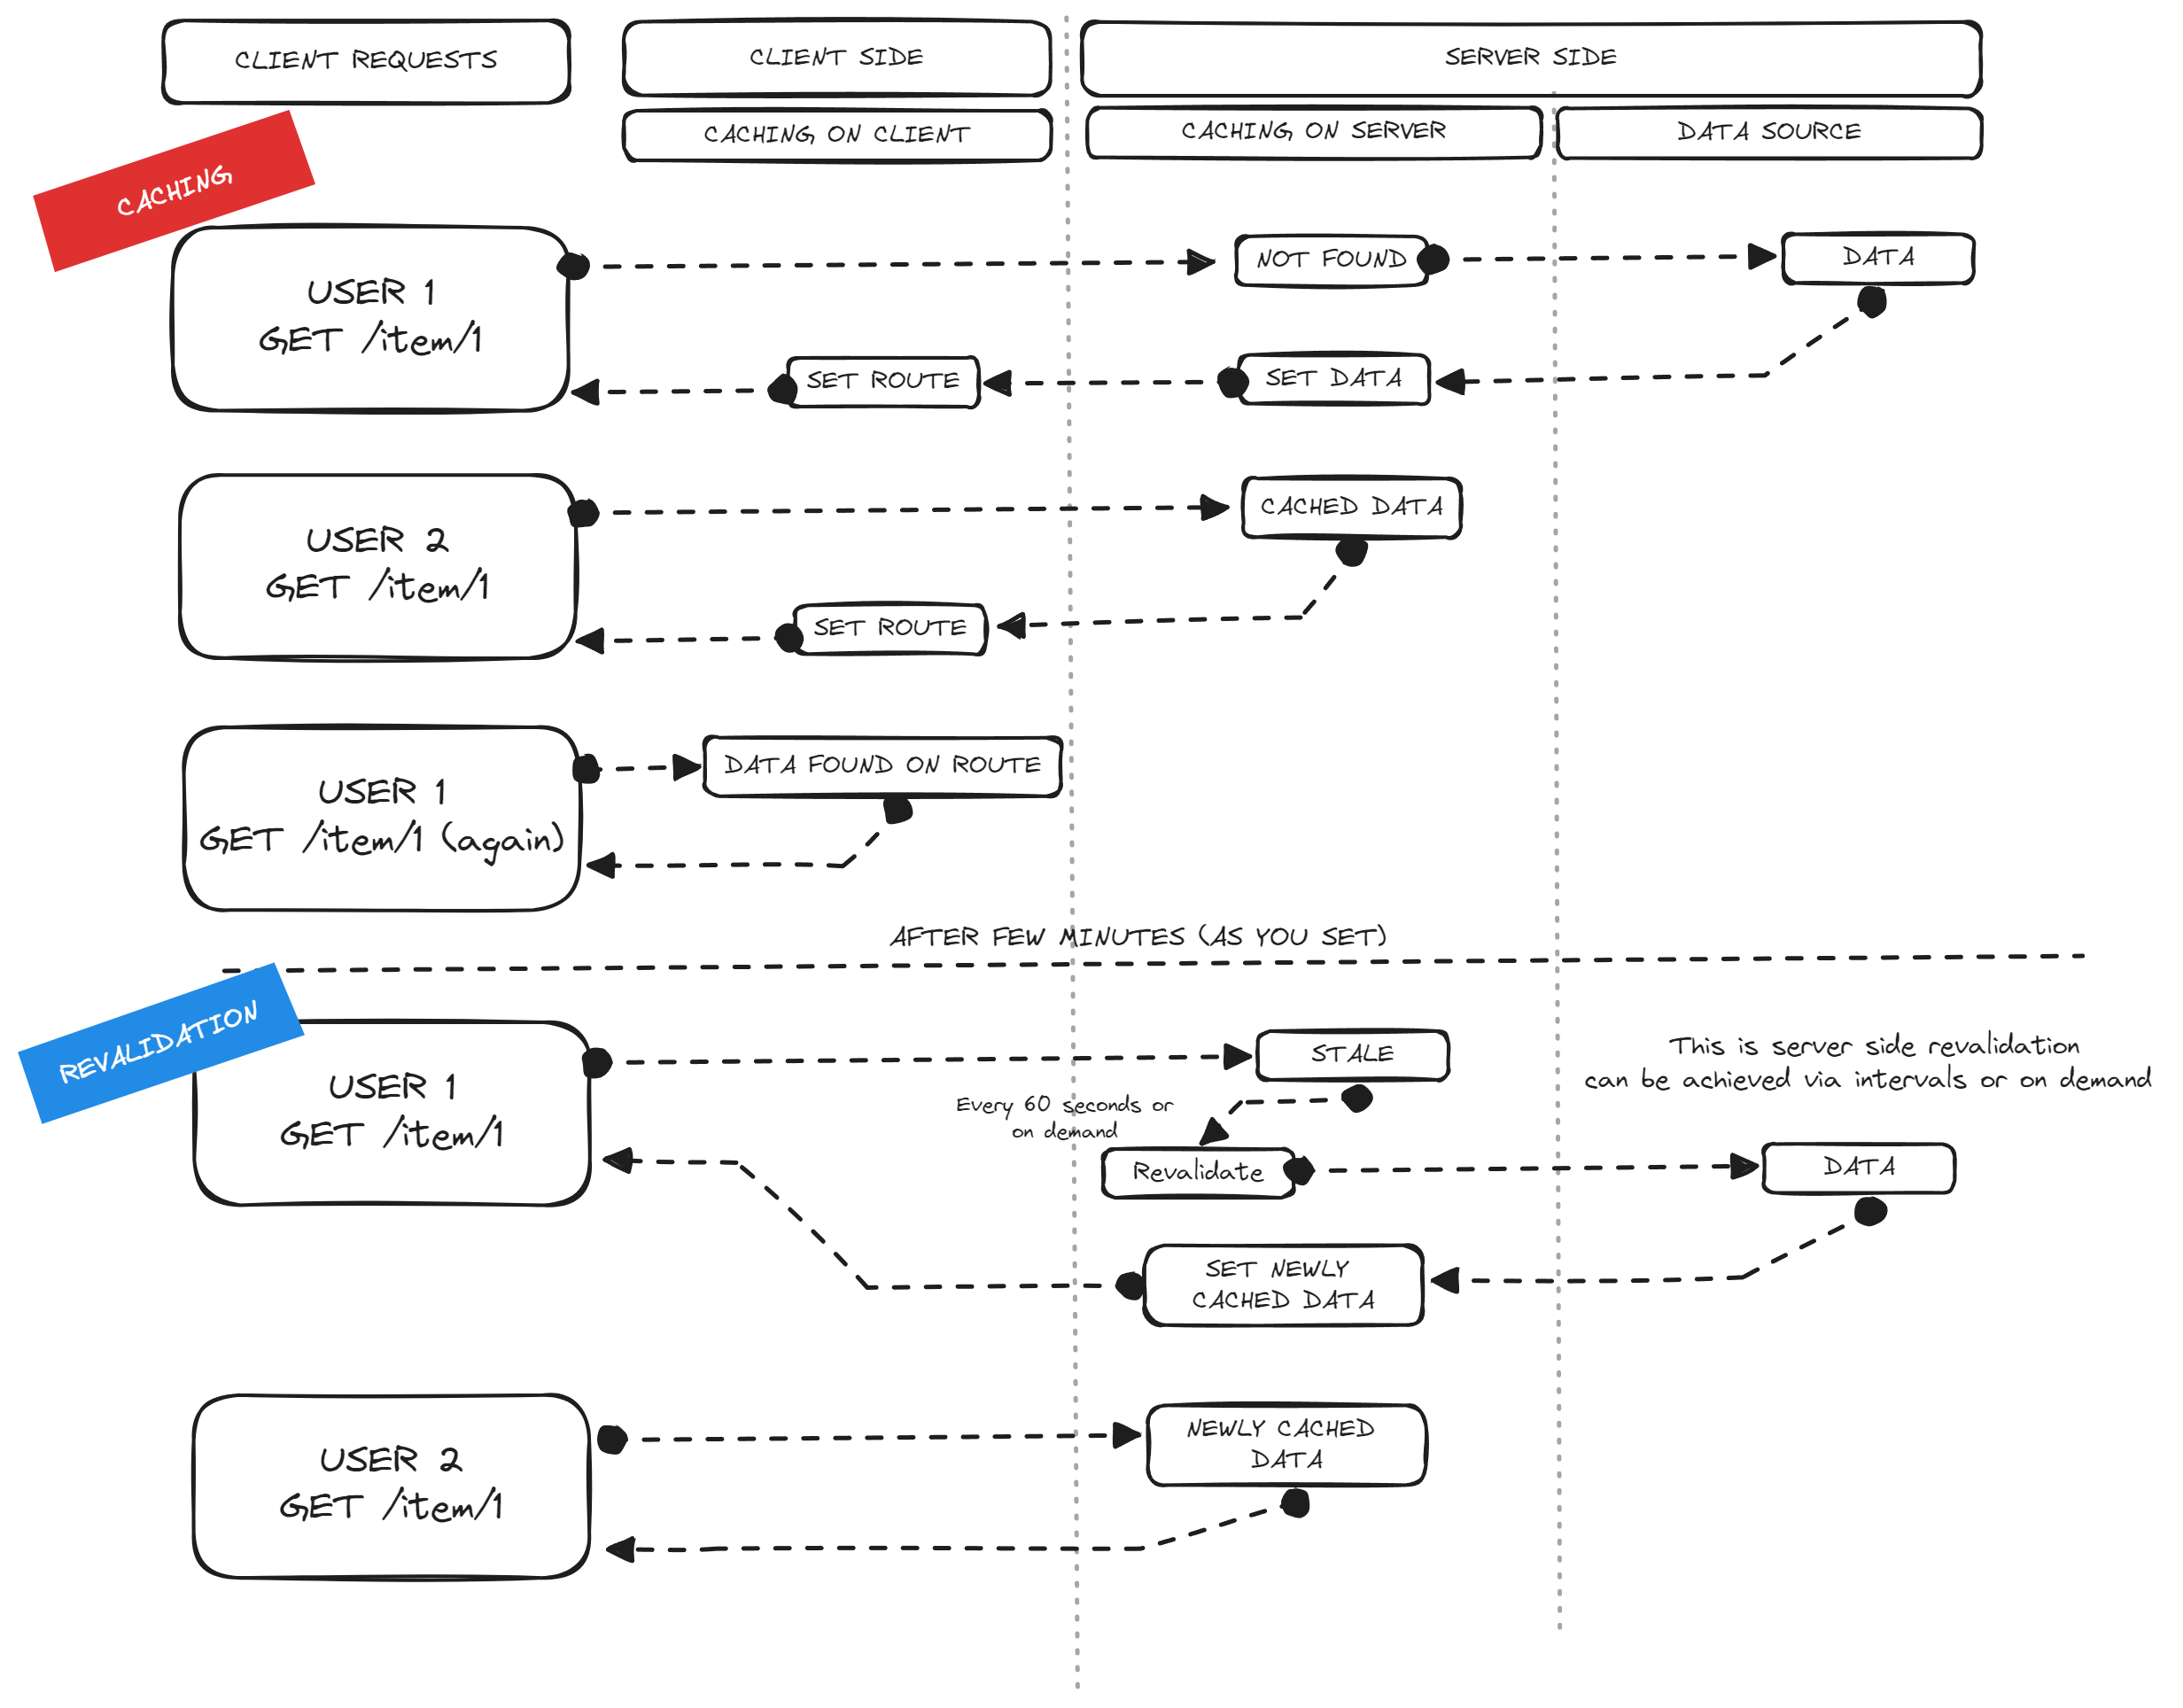
A major feature which is often missed out by many web application especially dealing with data sharing and database like ecommerce websites, is data revalidation.
Like this one, where data is not always fetch from data source (database) but cached on the server to access latest revalidated data faster, also revalidating server component with a live UI update on client side as well as revalidating cache on server side for all clients.
Data Revalidation
The process of reviewing, verifying, and ensuring the accuracy and completeness of data in a database or dataset. This is a crucial step in maintaining data quality and integrity. The revalidation process may involve checking for errors, inconsistencies, and outdated information.
Here outdated information is often referred to cached data on the servers. This is how things work under the hood though...
For more information checkout latest Caching in Nextjs
In short, Caching just boost your page performance while maintaining the SEO and with the help of revalidation client always gets fresh data.
Practice Project
Let's make a mini demonstration project using these features.
Requirement
Step 1: Create an account on mockapi.io
Step 2: Create project
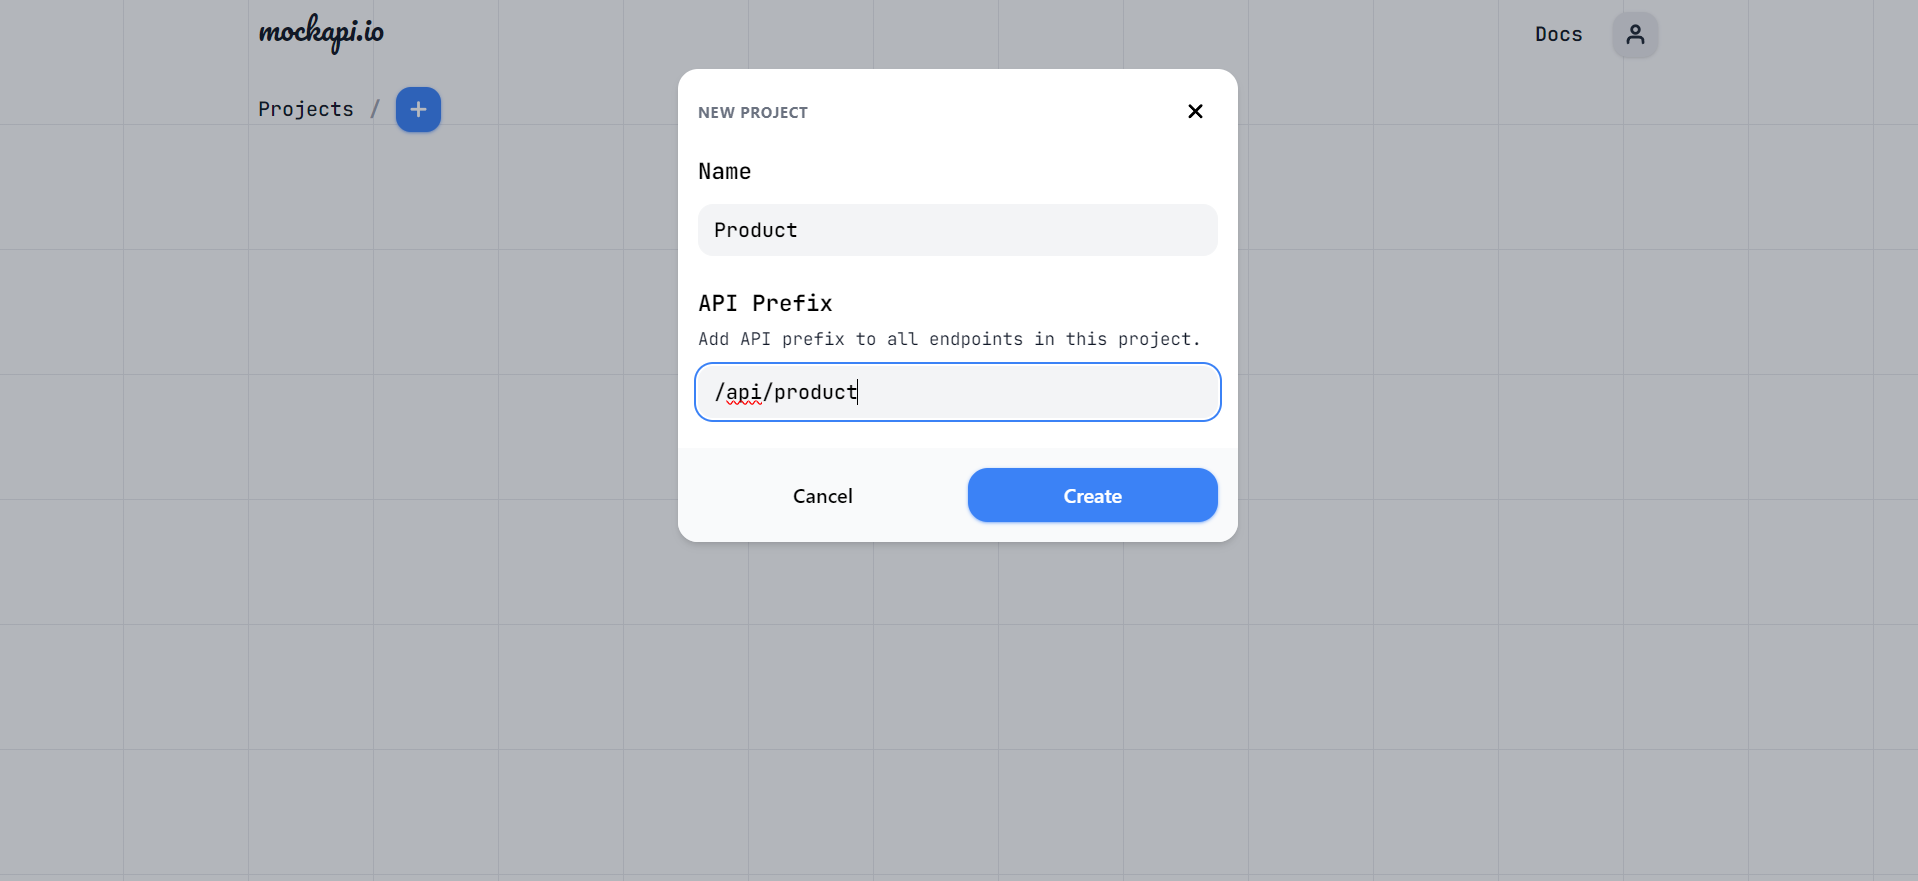
Step 3: Create Schema with new resource and generate data using the slider
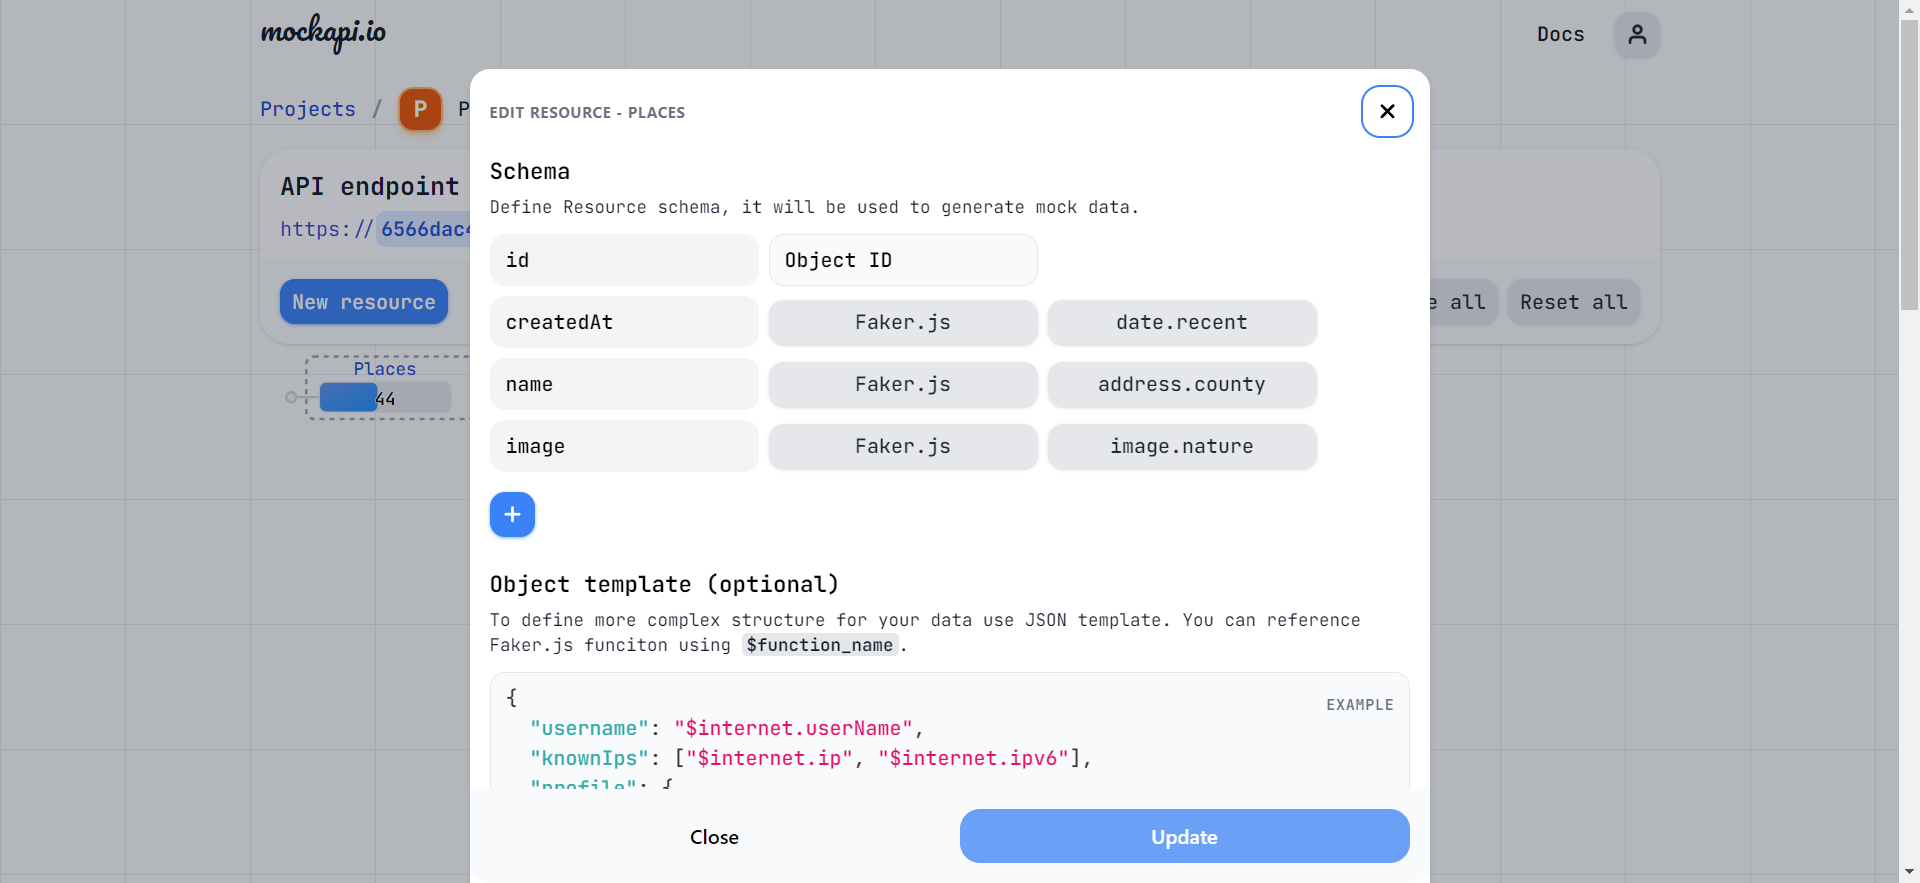
You will be left with a url like this, replace the endpoint with your schema name
https://XXXXXXXXXXXXXXXXXXXXX.mockapi.io/api/product/:endpoint
Create a .env.local file in the root directory
MOCKAPI = https://XXXXXXXXXXXXXXXXXXXXX.mockapi.io/api/product/:endpoint
Server Side (App Directory)
Step 1: Initialize a Nextjs App using terminal
npx create-next-app server-demo
√ Would you like to use TypeScript? ... Yes
√ Would you like to use ESLint? ... Yes
√ Would you like to use Tailwind CSS? ... Yes
√ Would you like to use `src/` directory? ... Yes
√ Would you like to use App Router? (recommended) ... Yes
? Would you like to customize the default import alias (@/*)? » No

cd server-demo
Step 2 Inside src/app/page.tsx replace with this code below:
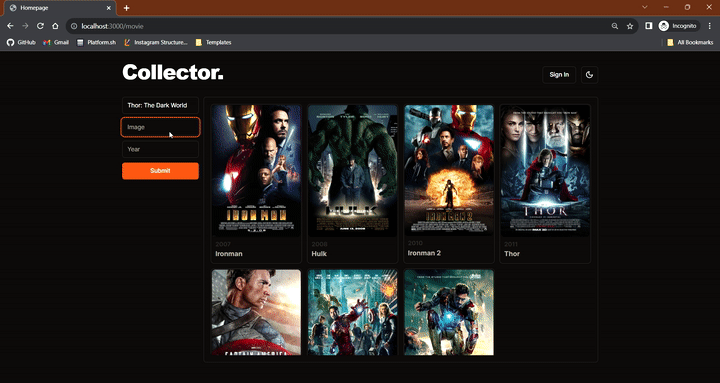
export default function Home() {
  return (
    <main className="grid max-w-3xl mx-auto p-4 gap-4">
      <h1 className="text-4xl font-extrabold max-lg:text-3xl">Homepage</h1>
      <div className="grid grid-cols-3 gap-3">
        <form
          action=""
          className="flex flex-col gap-2 p-1 rounded-lg bg-slate-400/10"
        >
          <input
            name="name"
            placeholder="Name"
            className="p-2 rounded-md outline-none"
            type="text"
          />
          <input
            name="image"
            placeholder="Image"
            className="p-2 rounded-md outline-none"
            type="text"
          />
          <button
            type="submit"
            className="bg-orange-600 font-extrabold uppercase text-white/70 p-2 rounded-md"
          >
            Submit
          </button>
        </form>
      </div>
    </main>
  );
}
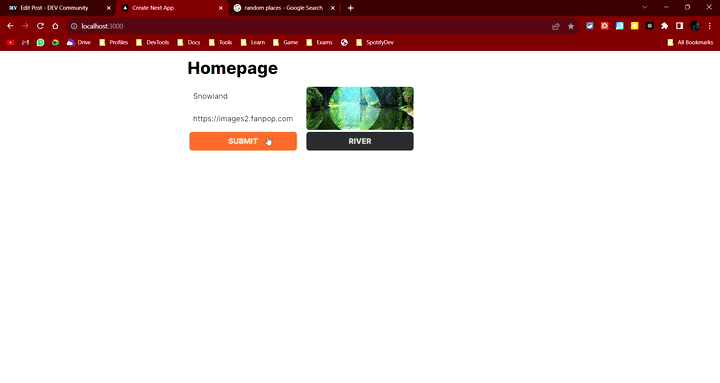
Output

Step 3: Create a new file Card.tsx within src/app and paste this code below:
"use client";
import Image from "next/image";
import React from "react";

type Props = {
  props: {
    id: string;
    name: string;
    image: string;
    createdAt: string;
  };
};

const Card = ({ props }: Props) => {
  return (
    <div className="flex flex-col gap-1 p-1 rounded-lg bg-slate-400/10">
      <div className="relative overflow-hidden flex-1 rounded-md bg-slate-400/30">
        <Image
          src={props.image}
          alt={props.name}
          fill
          loader={() => props.image}
          className="object-cover"
        />
      </div>
      <span className="bg-zinc-800 font-extrabold uppercase text-white/70 p-2 rounded-md text-center">
        {props.name}
      </span>
    </div>
  );
};

export default Card;
Now import Card.tsx into the page.tsx just below </form>
//</form>
//Card Component
<Card props={{
      id: "1",
      name: "Bellgium",
      image: "https://loremflickr.com/640/480/nature",
      createdAt: "2023-11-29T05:14:05.972Z",
}} />
//</div>
Output

Step 4: Remember to make default function async in page.tsx
export default async function Home()
Fetching data on server component with the mockapi endpoint
//export default async function Home() {
  const res = await fetch(process.env.MOCKAPI!, {
    next: {
      tags: ["place"],
      revalidate: 60 * 60,
    },
  });
  const data = await res.json();
  //return (
Using fetched data below by wrapping Card component inside array map function
//</form>
{data.map((place: any) => (
<Card props={place}
/>))}
//</div>
Output

Step 5 Important Now coming to the serverAction part, where our revalidation will take place after adding a new data.
Create an async function before return in page.tsx
async function serverAction(e: FormData) {
    "use server";
    let name = e.get("name")?.toString();
    let image = e.get("image")?.toString();

    if (!name && !image) return

    const newPlace = {
      name,
      image
    }

    await fetch(process.env.MOCKAPI!, {
      method: "post",
      body: JSON.stringify(newPlace),
      headers: { "Content-Type": "application/json" },
    });

    revalidateTag('place')
  }
Add the function's name to form action
<form action={serverAction}
className="flex flex-col gap-2 p-1 rounded-lg bg-slate-400/10" >
Thats all, you will see such output
Client Side (TanStack React Query)
Using Tanstack React Query provides you awesome control over data fetching and manipulation on the Client Side UI.
Step 1: Initialize a Nextjs App using terminal
npx create-next-app client-demo
√ Would you like to use TypeScript? ... Yes
√ Would you like to use ESLint? ... Yes
√ Would you like to use Tailwind CSS? ... Yes
√ Would you like to use `src/` directory? ... Yes
√ Would you like to use App Router? (recommended) ... Yes
? Would you like to customize the default import alias (@/*)? » No

cd client-demo
Step 2: Replace this code from page.tsx
"use client";

const ClientPage = () => {
  return (
    <main className="grid max-w-3xl mx-auto p-4 gap-4">
      <h1 className="text-4xl font-extrabold max-lg:text-3xl">Client Page</h1>
      <div className="grid grid-cols-3 gap-3">
        <form className="flex flex-col gap-2 p-1 rounded-lg bg-slate-400/10">
          <input
            name="name"
            placeholder="Name"
            className="p-2 rounded-md outline-none"
            type="text"
          />
          <input
            name="image"
            placeholder="Image"
            className="p-2 rounded-md outline-none"
            type="text"
          />
          <button
            type="submit"
            className="bg-purple-600 hover:bg-purple-600/90 font-extrabold uppercase text-white/70 p-2 rounded-md"
          >
            Submit
          </button>
        </form>
      </div>
    </main>
  );
};

export default ClientPage;
Step 3: Steup Tanstack React Query
npm i @tanstack/react-query
Create a file outside app folder provider.tsx containing following:
"use client";

import React, { useState } from "react";
import { QueryClient, QueryClientProvider } from "@tanstack/react-query";

const ReactQueryProvider = ({ children }: { children: React.ReactNode }) => {
  const [queryClient] = useState(() => new QueryClient());
  return (
    <QueryClientProvider client={queryClient}>{children}</QueryClientProvider>
  );
};

export default ReactQueryProvider;
Inside /src/app edit layout.tsx wrap children with exported ReactQureyProvider:
<body className={inter.className}>
        <ReactQueryProvider>{children}</ReactQueryProvider>
</body>
Step 4: Using QueryClient fetching data on client side
//const ClientPage = () => {
const queryClient = useQueryClient();

  // Queries
  const { data, isLoading } = useQuery({
    queryKey: ["place"],
    queryFn: async () => {
      const res = await fetch(process.env.MOCKAPI!);
      const fetchedData = await res.json();
      return fetchedData;
    },
  });

//return (
Adding loading state to the page after form field
//</form>
        {isLoading ? (
          <div className="flex flex-col gap-1 p-1 rounded-lg bg-slate-400/10">
            <div className="relative overflow-hidden min-h-[90px] flex-1 rounded-md bg-slate-400/30"></div>
            <span className="bg-zinc-800 font-extrabold uppercase text-white/70 p-2 rounded-md text-center animate-pulse">
              Loading
            </span>
          </div>
        ) : (
          data.map((e: any) => <Card key={e.id} props={e} />)
        )}
//</div>
Step 5: Revalidating client side data after successfully fetching data
// Mutations
  const { mutate, isPending } = useMutation({
    mutationFn: async (newData) => {
      const res = await fetch(process.env.MOCKAPI!,
        {
          method: "post",
          headers: { "Content-Type": "application/json" },
          body: JSON.stringify(newData),
        }
      );
      return res.json();
    },
    onSuccess: () => {
      queryClient.invalidateQueries({ queryKey: ["place"] });
    },
  });

//return (
Adding form actions function for getting data and post it.
<form action={(e) => {
            const name = e.get("name")?.toString();
            const image = e.get("image")?.toString();

            if (!name && !image) return;

            mutate({ name, image });
          }}
          className="flex flex-col gap-2 p-1 rounded-lg bg-slate-400/10">
Output
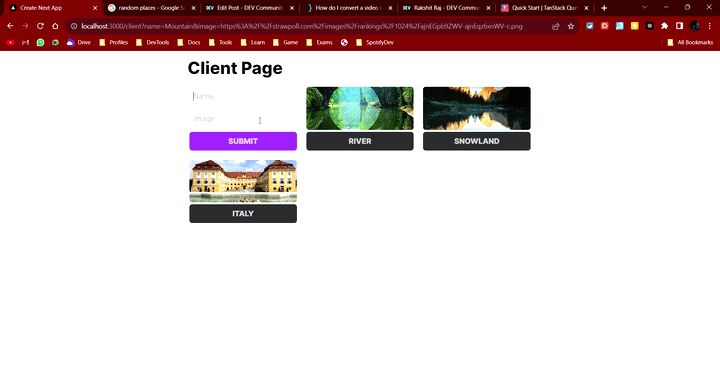
No Reloads!