Create VS Code Extension with React, TypeScript, Tailwind
TL;DR
This article also deals with basics of Making of VS Code Extension other than react, typescript, tailwindcss. For just get to the point directly, click here, or else we can dive into it.

Table Of Contents
- Introduction
- Understanding Extension Creation
- Webview API for UI
- Styling UI
- Scripting
- Implementing React, TypeScript, Tailwind
- Bonus: VS Code UI Toolkit (React)
Introduction
This article is dedicated for those people who prefer a code editor called VS Code, which is quite underrated and under used all along.
Inside the code editor there is a section for extensions which enables additional helping hand while coding like snippets (auto complete), debugging, theme and more such more useful extensions.
For example, The Postman VS Code extension enables you to develop and test your APIs in Postman directly from Visual Studio Code.
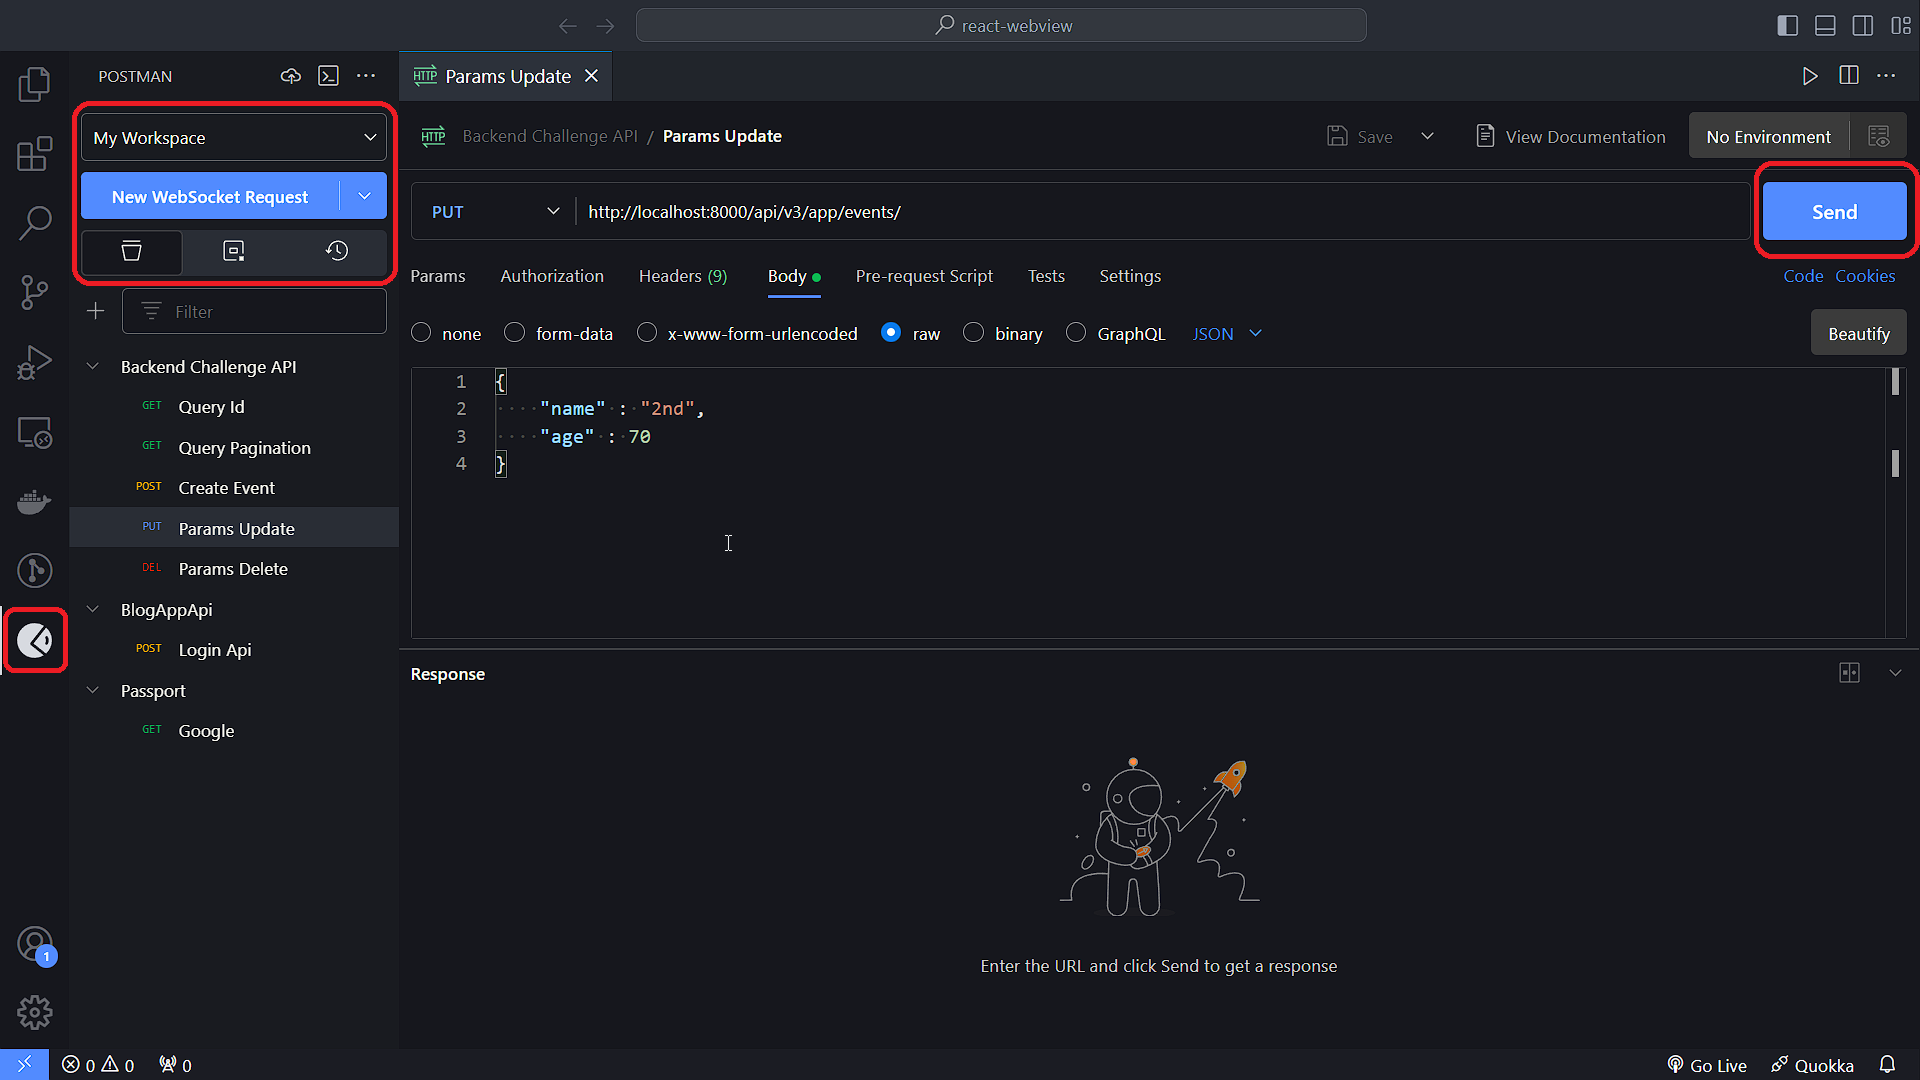
In the above extension, the shown UI is inside VS Code which is possible due the help of extension by Postman. As it seems an integral part of code editor too, but for sure this was made using html , css and javascript only, and any one can make it easily.
To make sure yourself just press, Ctrl + Shift + P and select Developer: Toggle Developer Tools to reveal the dev tools inside VS Code.
As mentioned in the above gif, one can inspect any extension easily as they inspect any web page. Now coming to the important part, how to make such extension.
Let's begin with it...
Understanding Extension Creation
For creating an extension VS Code uses a cli tool called Yeoman and Code-Generator.
Before getting started, you need npm installed and basic knowledge of node.
Installing package globally
npm install --global yo generator-code
Initiating the extension installation
yo code
After which you will be introduced with this Yeomen menu of extensions
     _-----_     ╭──────────────────────────╮
    |       |    │   Welcome to the Visual  │
    |--(o)--|    │   Studio Code Extension  │
   `---------´   │        generator!        │
    ( _´U`_ )    ╰──────────────────────────╯
    /___A___\   /
     |  ~  |
   __'.___.'__
 ´   `  |° ´ Y `

? What type of extension do you want to create? (Use arrow keys)
> New Extension (TypeScript)
  New Extension (JavaScript)
  New Color Theme
  New Language Support
  New Code Snippets
  New Keymap
  New Extension Pack
  New Language Pack (Localization)
  New Web Extension (TypeScript)
  New Notebook Renderer (TypeScript)
Selection for different kind of extension, but in our case we are going with certain options
? What type of extension do you want to create? New Extension (TypeScript)
? Whats the name of your extension? HelloWorld
? Whats the identifier of your extension? helloworld
? Whats the description of your extension? LEAVE BLANK
? Initialize a git repository? Yes
? Bundle the source code with webpack? No
? Which package manager to use? npm

? Do you want to open the new folder with Visual Studio Code? Open with `code`
Inside the editor, open src/extension.ts and press F5. This will compile and run the extension in a new Extension Development Host window.
Run the Hello World command from the Command Palette Ctrl + Shift + P in the new window
Output will result in a VS Code Information Message (default): Hello World
You can play around by changing stuffs inside src/extension.ts:
// The module 'vscode' contains the VS Code extensibility API
// Import the module and reference it with the alias vscode in your code below
import * as vscode from 'vscode';

// This method is called when your extension is activated
// Your extension is activated the very first time the command is executed
export function activate(context: vscode.ExtensionContext) {

	// Use the console to output diagnostic information (console.log) and errors (console.error)
	// This line of code will only be executed once when your extension is activated
	console.log('Congratulations, your extension "helloworld" is now active!');

	// The command has been defined in the package.json file
	// Now provide the implementation of the command with registerCommand
	// The commandId parameter must match the command field in package.json
	let disposable = vscode.commands.registerCommand('helloworld.helloWorld', () => {
		// The code you place here will be executed every time your command is executed
		// Display a message box to the user
		vscode.window.showInformationMessage('Hello World from Helloworld!');
	});

	context.subscriptions.push(disposable);
}

// This method is called when your extension is deactivated
export function deactivate() {}
This file is the base of your extension. It contains 2 important methods: activate and deactivate . Imported vscode.command module registers command and context argument collectively subscribe to them.
Within the package.json
{
...,
  "activationEvents": [],
  "contributes": {
    "commands": [
      {
        "command": "helloworld.helloWorld",
        "title": "Hello World"
      }
    ]
  },
}
Contributes.command : Helps in displaying the command with a title in the command palate also consists of views and more.
Activation Events : Automates the triggering of a registered command on a certain condition
For more clarity you can visit Your First Extension by VS Code
But, this article is not just about any normal extension. For, UI part we will use WebViews by VS Code.
Webview API for UI
The Webview allows extensions to create fully customizable views within Visual Studio Code. For quick implementation follow these steps:
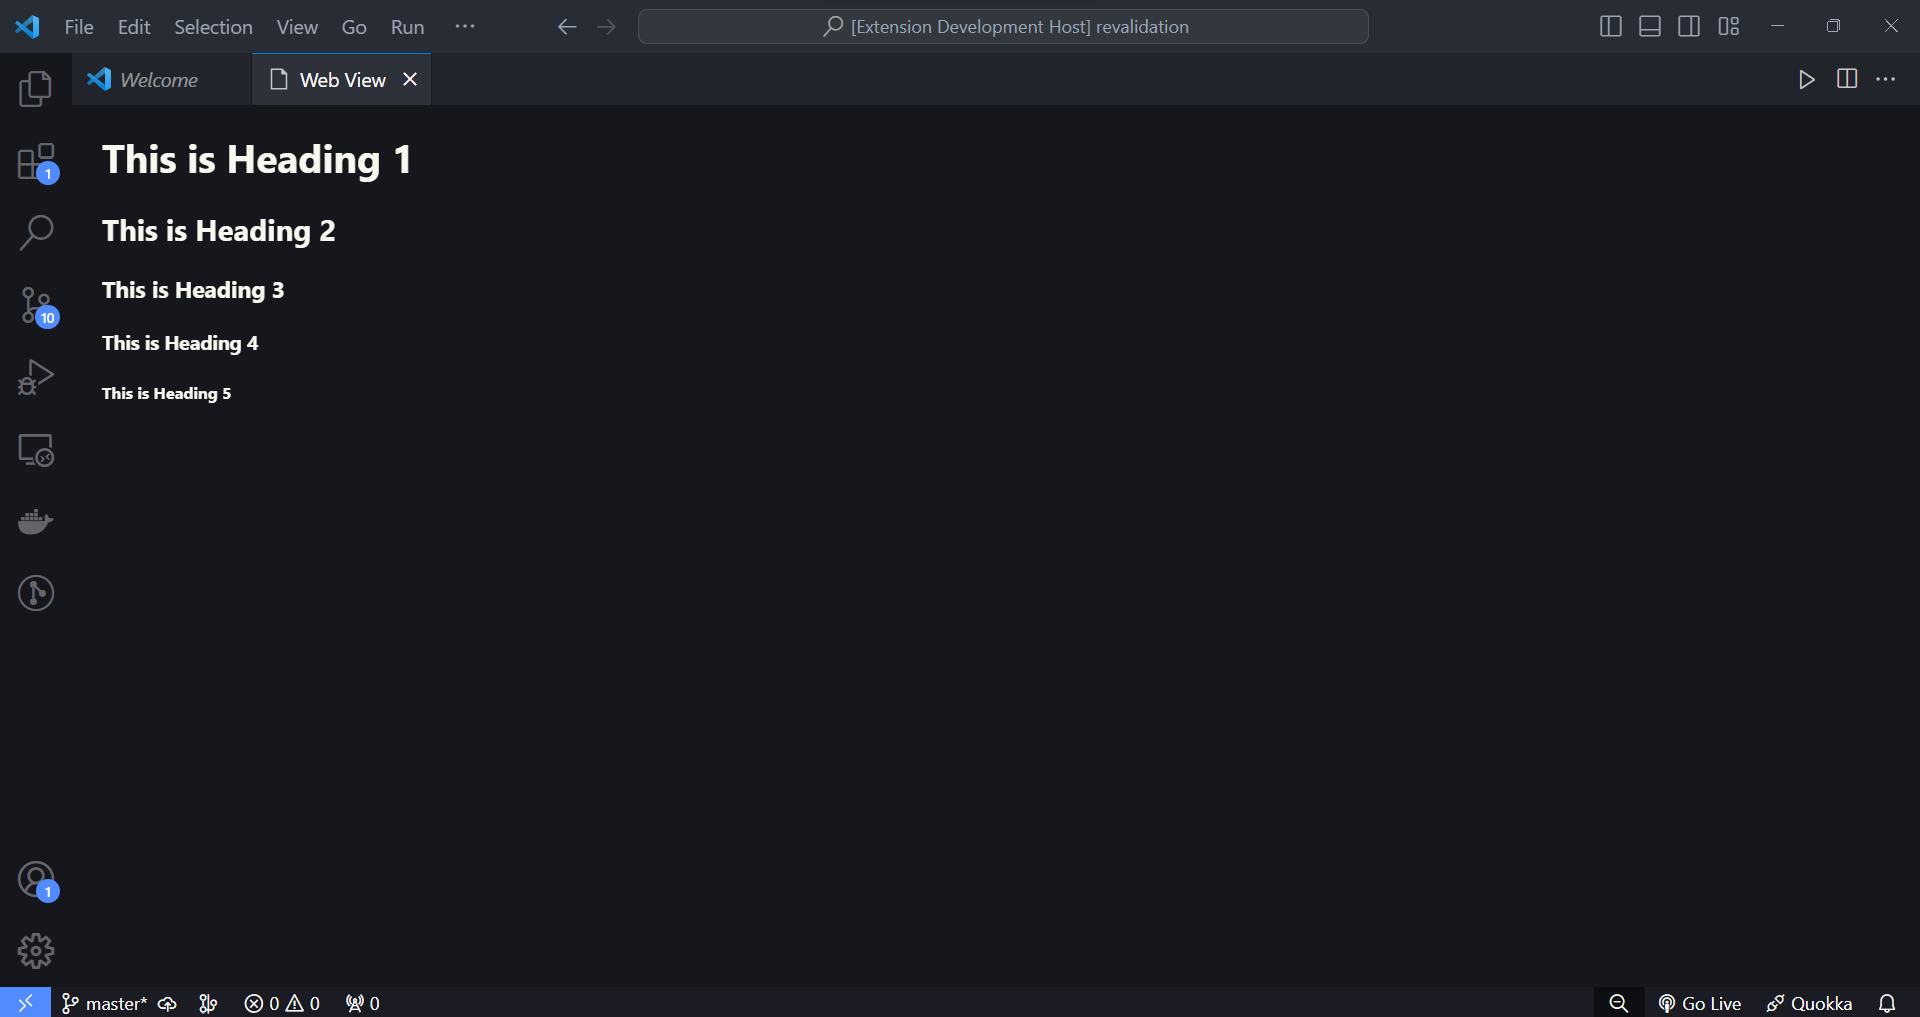
Overwrite the src/extension.ts file with the code below:
import * as vscode from 'vscode';

export function activate(context: vscode.ExtensionContext) {

	console.log('Congratulations, your extension "Webview" is up and running now');

	let webview = vscode.commands.registerCommand('helloworld.webview', () => {

		let panel = vscode.window.createWebviewPanel("webview", "Web View", {
			viewColumn: vscode.ViewColumn.One,
		})

		// will set the html here
                 panel.webview.html = `<h1>This is Heading 1</h1>
	<h2>This is Heading 2</h2>
	<h3>This is Heading 3</h3>
	<h4>This is Heading 4</h4>
	<h5>This is Heading 5</h5>`

	});

	});

	context.subscriptions.push(webview);
}

export function deactivate() { }
Key Points to be noticed:
-
For creating a Webview Panel with the help of a command
helloworld.webview, we need to register it with it's callback.panelis used for setting html into the webview. -
With in the callback,
vscode.window.createWebviewPanelmethod is called which takes 4 arguments,viewType,title(title of the webview panel),showOption(which column and to focus),options(important, as it deals with security like scripting and accessibility of resources to the panel) and it returnsvscode.WebviewPanel -
Important Step: If you ever register a new command, always remember to add it to
package.jsonundercontributes.commands
{
...,
"contributes": {
    "commands": [
      {
        "command": "helloworld.webview",
        "title": "Web View"
      }
    ]
  },
}
and, run the extension with F5, which eventually leads to opening another vscode window Extension Development. Then press Ctrl + Shift + P, enter on Web View (or command title you mentioned inside package.json) in the command palate.
The appearing window must look like this
Styling UI
Styling is same as the web using css as usual but here is a catch, if you are writing css externally, you need to first allow that resource.
By default, all the local resources within the extension location and workspace are accessible. To control them just alter the code for createWebviewPanel by providing it with 4th argument localResourceRoots.
// while creating panel allow the path you want to add
// in my case adding media as rootDir to localResources
let panel = vscode.window.createWebviewPanel("webview", "Web View", {
       viewColumn: vscode.ViewColumn.One
},{    localResourceRoots: [vscode.Uri.joinPath(context.extensionUri, "media")]
     })
Next step is to create a folder named media in the root directory inside the extension folder.
Inside the folder you can put all your styling files such as images, svg, css files, etc.
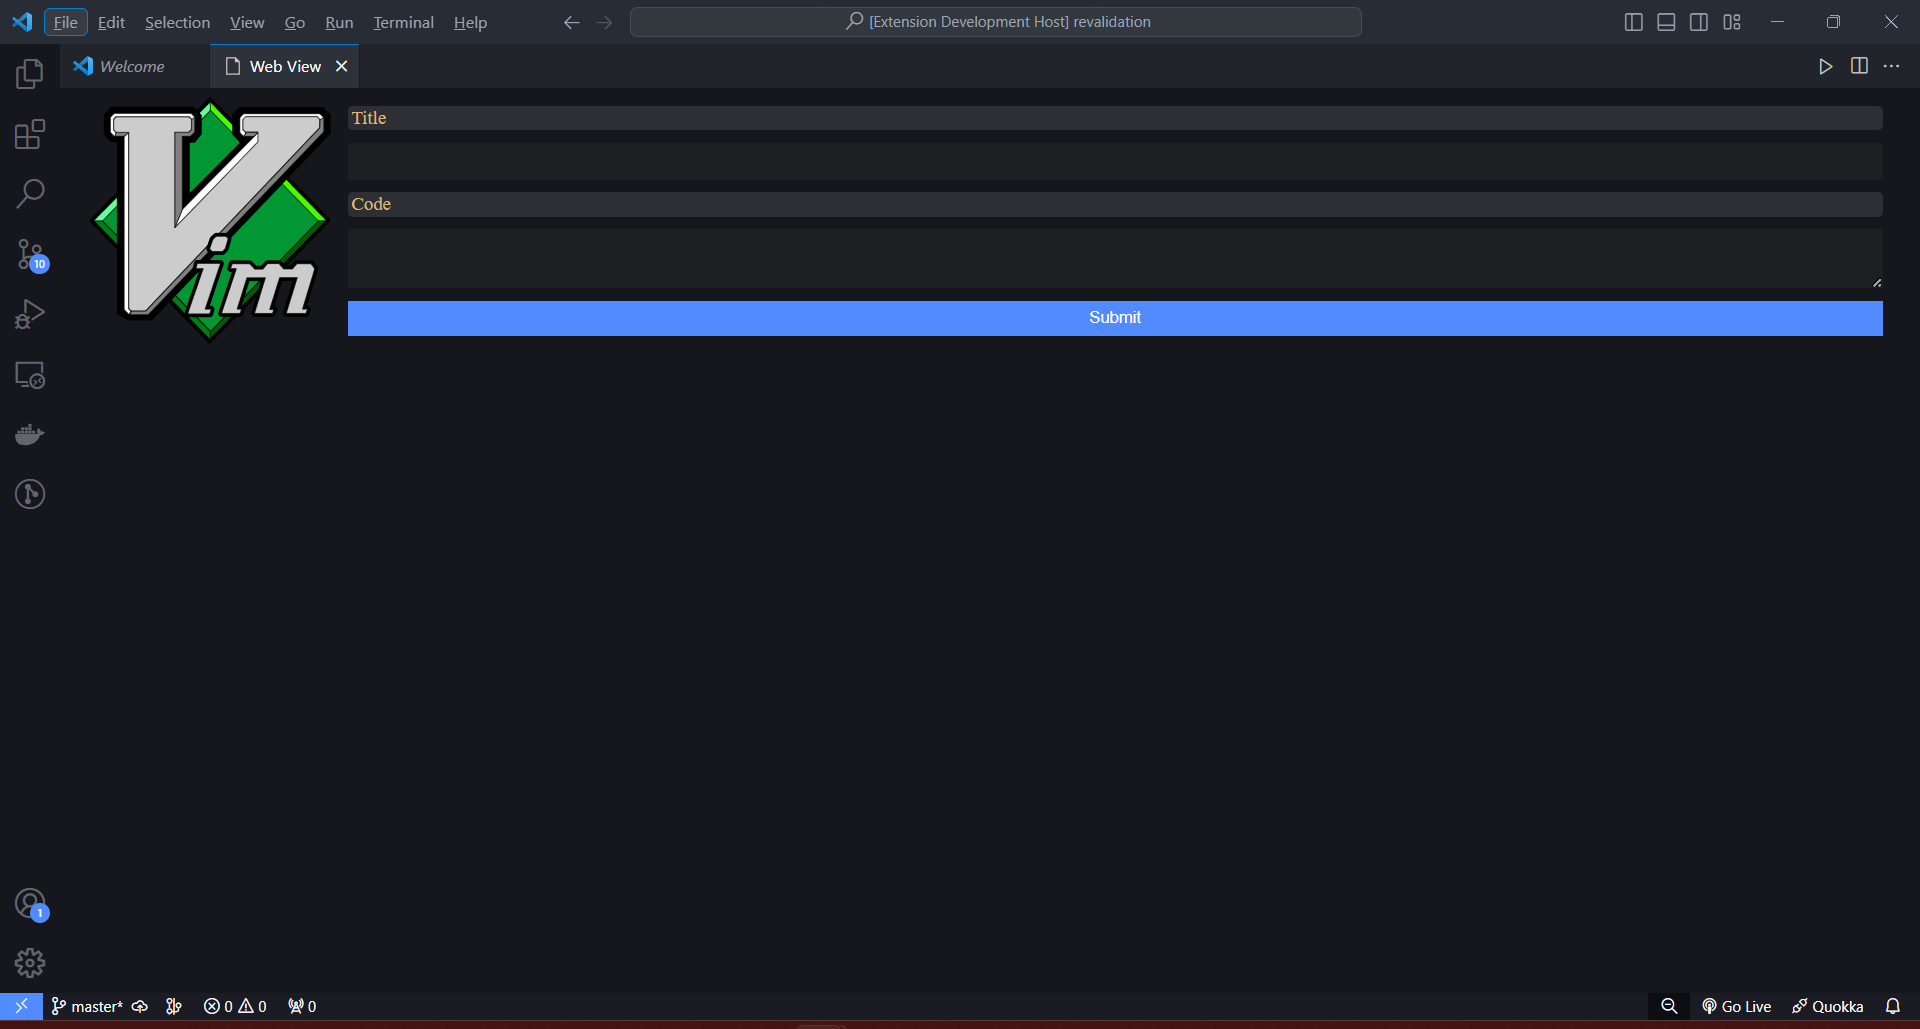
Craete a file vscode.css (you can name anything) inside media folder. Add the content below
:root {
  --container-paddding: 20px;
  --input-padding-vertical: 6px;
  --input-padding-horizontal: 4px;
  --input-margin-vertical: 4px;
  --input-margin-horizontal: 0;
}

html {
  box-sizing: border-box;
  font-size: 13px;
}

*,
*:before,
*:after {
  box-sizing: inherit;
}

body,
h1,
h2,
h3,
h4,
h5,
h6,
p,
ol,
ul {
  margin: 0;
  padding: 0;
  font-weight: normal;
}

img {
  max-width: 100%;
  height: auto;
}

body {
  padding: 0 var(--container-paddding);
  color: var(--vscode-foreground);
  font-size: var(--vscode-font-size);
  font-weight: var(--vscode-font-weight);
  font-family: var(--vscode-font-family);
  background-color: var(--vscode-editor-background);
}

ol,
ul {
  padding-left: var(--container-paddding);
}

body > *,
form > * {
  margin-block-start: var(--input-margin-vertical);
  margin-block-end: var(--input-margin-vertical);
}

*:focus {
  outline-color: var(--vscode-focusBorder) !important;
}

a {
  color: var(--vscode-textLink-foreground);
}

a:hover,
a:active {
  color: var(--vscode-textLink-activeForeground);
}

code {
  font-size: var(--vscode-editor-font-size);
  font-family: var(--vscode-editor-font-family);
}

button {
  border: none;
  padding: var(--input-padding-vertical) var(--input-padding-horizontal);
  width: 100%;
  text-align: center;
  outline: 1px solid transparent;
  outline-offset: 2px !important;
  color: var(--vscode-button-foreground);
  background: var(--vscode-button-background);
}

button:hover {
  cursor: pointer;
  background: var(--vscode-button-hoverBackground);
}

button:focus {
  outline-color: var(--vscode-focusBorder);
}

button.secondary {
  color: var(--vscode-button-secondaryForeground);
  background: var(--vscode-button-secondaryBackground);
}

button.secondary:hover {
  background: var(--vscode-button-secondaryHoverBackground);
}

input:not([type="checkbox"]),
textarea {
  display: block;
  width: 100%;
  border: none;
  font-family: var(--vscode-font-family);
  padding: var(--input-padding-vertical) var(--input-padding-horizontal);
  color: var(--vscode-input-foreground);
  outline-color: var(--vscode-input-border);
  background-color: var(--vscode-input-background);
}

input::placeholder,
textarea::placeholder {
  color: var(--vscode-input-placeholderForeground);
}

.container {
  display: flex;
}

.form {
  display: flex;
  flex-direction: column;
  flex: 1;
  padding: 10px;
  gap: 10px;
}
Styling above will help you the reset the default styling property of the element of html to once looks like native styling of vscode. Variables mentioned above is directly provided by vscode.
You can also add any image of your choice, just place image file inside media folder.
For applying the css stylesheet and image, just add this lines and apply to html
const cssStyle = panel.webview.asWebviewUri(vscode.Uri.joinPath(context.extensionUri, "media", "vscode.css"))

const imgSrc = panel.webview.asWebviewUri(vscode.Uri.joinPath(context.extensionUri, "media", "vim.svg"))

panel.webview.html = `<!DOCTYPE html>
	<html lang="en">
	<head>
		<meta charset="UTF-8">
		<meta name="viewport" content="width=device-width, initial-scale=1.0">
		<link rel="stylesheet" type="text/css" href="${cssStyle}" />
	</head>
	<body>
	<div class="container">
		<img src="${imgSrc}" width="200" />
		<div class="form">
			<code>Title</code>
			<input />
			<code>Code</code>
			<textarea></textarea>
			<button>Submit</button>
		</div>
	</div>
	</body>
	</html>`
Quick Tip: To see the changes in html you need to reload the entire extension, Ctrl + R to quick reload, no need to restart every time with Ctrl + F5
Expected Output:
Scripting
You can also update DOM inside your extension using javascript. But it needs to be enabled before.
let panel = vscode.window.createWebviewPanel("webview", "Web View", {
			viewColumn: vscode.ViewColumn.One
		},{
		enableScripts: true
	})

const scriptPath= panel.webview.asWebviewUri(vscode.Uri.joinPath(context.extensionUri, "media", "script.js"))

panel.webview.html = `<!DOCTYPE html>
	<html lang="en">
	<head>
		<meta charset="UTF-8">
		<meta name="viewport" content="width=device-width, initial-scale=1.0">
		<script src="${scripts}"></script>
	</head>
	<body>
	<h1>Count:</h1>
        <p id="count">0</p>
	<button onclick="changeHeading()">Add</button>
	</body>
	</html>`
Now, create file script.js inside media folder, and add following lines.
//script.js
function changeHeading() {
    document.getElementById("count").textContent = +document.getElementById("count").textContent + 1
}
Expected Output after running extension
Fun Fact: You don't need to reload to see the changes for the scripting part, just close and reopen the web view.
Implementing React, TypeScript, Tailwind
After learning much about the extension and webviews, it's time to get along with frameworks, for obvious reasons that they make things easier while using different libraries.
Starting with react, you can choose any framework of your choice.
Step 1 Initializing extension with yo code
yo code

? What type of extension do you want to create? New Extension (TypeScript)
? Whats the name of your extension? react-ext
? Whats the identifier of your extension? react-ext
? Whats the description of your extension? LEAVE BLANK
? Initialize a git repository? Yes
? Bundle the source code with webpack? No
? Which package manager to use? npm

? Do you want to open the new folder with Visual Studio Code? Open with `code`
Step 2 Inside root directory creating a react app with typescript.
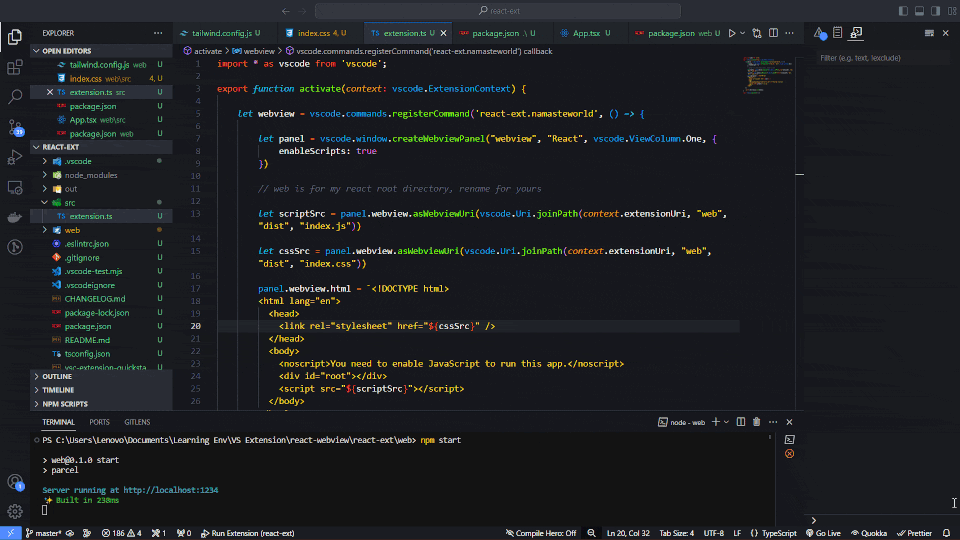
npx create-react-app web --template typescript
cd web
Step 3 Inside react app directory web, Setting up tailwindcss
npm i -D tailwindcss postcss
npx tailwindcss init
Editing tailwind.config.js
//tailwind.config.js
module.exports = {
  content: ['./src/**/*.{js,jsx,ts,tsx}'],
  theme: {
    extend: {},
  },
  plugins: [],
}
Editing web/src/index.css
@tailwind base;
@tailwind components;
@tailwind utilities;

body {
  @apply p-0;
}
Step 4 Inside React directory, creating file named .postcssrc
//.postcssrc
{
  plugins: {
    tailwindcss: { },
  },
}
Step 5 Editing react app web/src/App.tsx
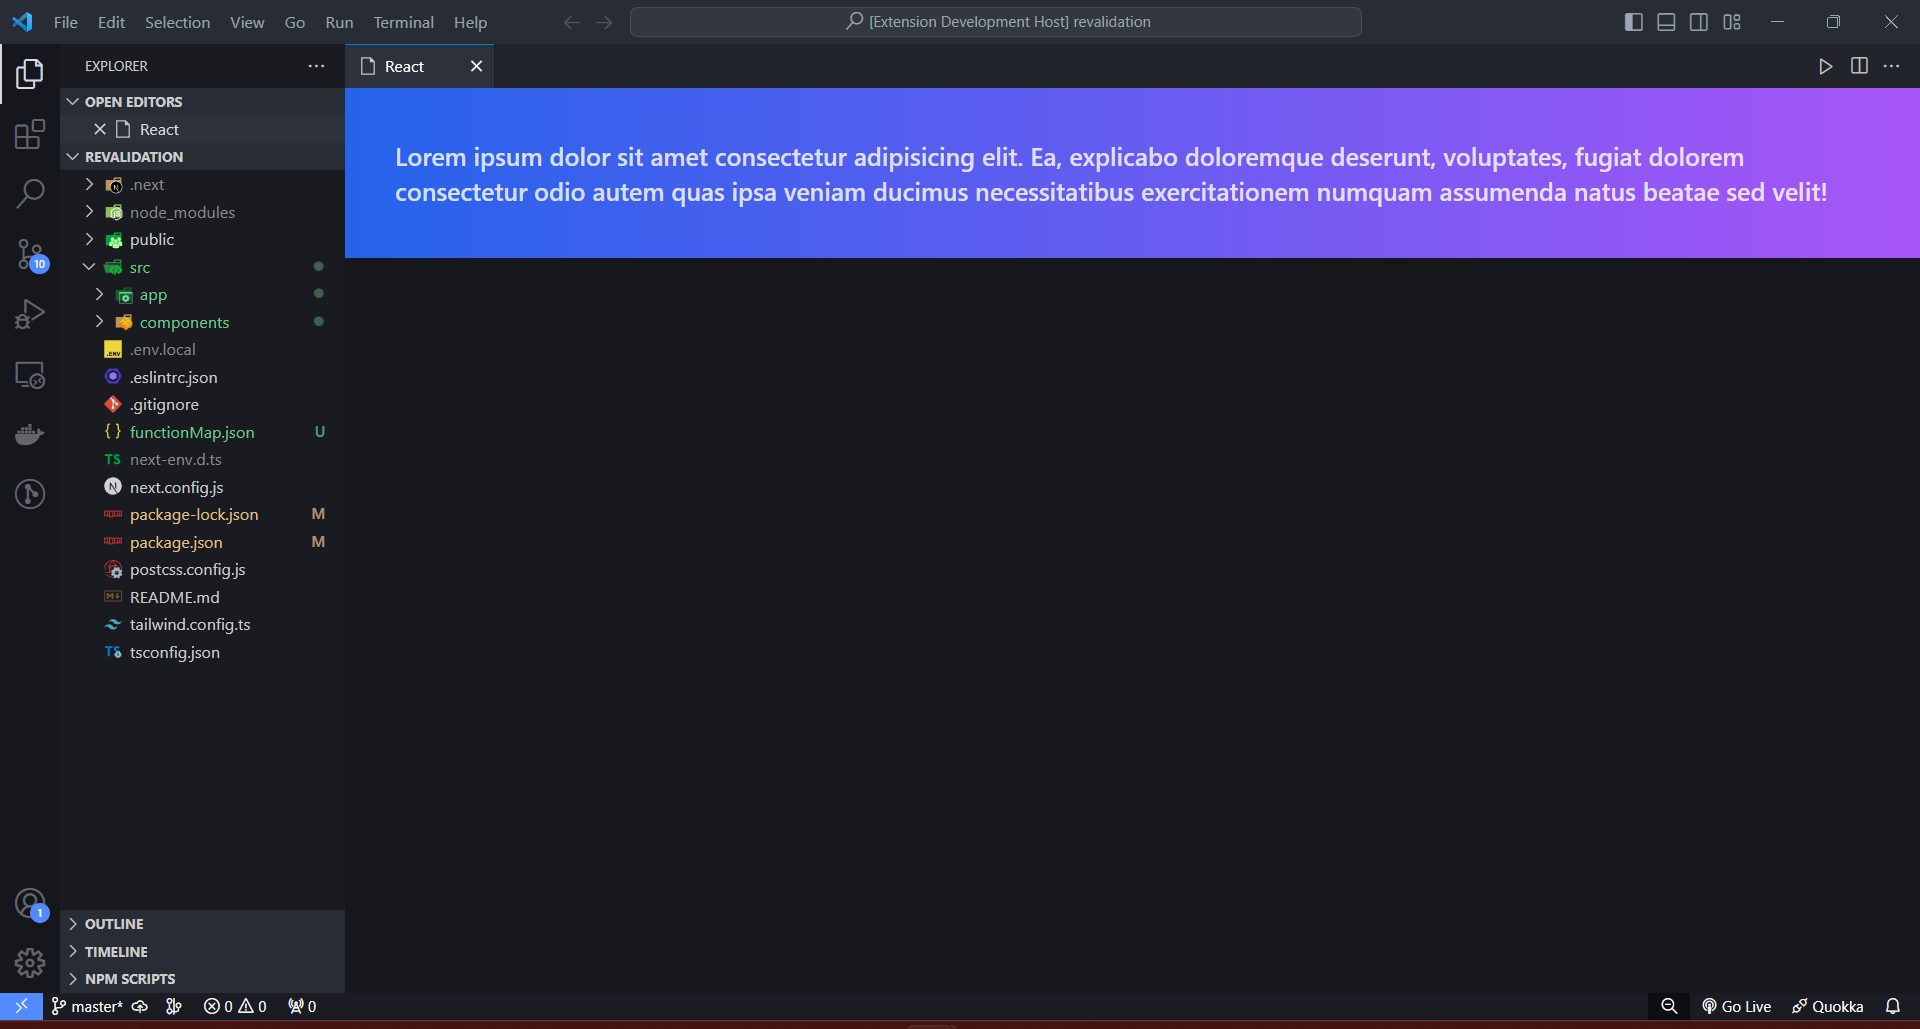
function App() {
  return (
    <div className="bg-gradient-to-r from-blue-600 to-purple-500 p-10">
      <p className="text-white/80 text-xl font-semibold">
        Lorem ipsum dolor sit amet consectetur adipisicing elit. Ea, explicabo
        doloremque deserunt, voluptates, fugiat dolorem consectetur odio autem
        quas ipsa veniam ducimus necessitatibus exercitationem numquam assumenda
        natus beatae sed velit!
      </p>
    </div>
  );
}

export default App;
Step 6 Setup Parcel, most lightweight bundler (honestly after trying webpack and babel and rollup, i felt wastage of time)
Installing Parcel as Dev Dependency inside React Root Directory web
npm i -D parcel
Inside React app, Editing package.json
//web/package.json
{
...,
"source": "src/index.tsx",
"scripts": {
    "start": "parcel", //overwrite
    "build": "parcel build", //overwrite
    "test": "react-scripts test",
    "eject": "react-scripts eject"
  },
}
Running Parcel (Parcelling)
npm start

#> web@0.1.0 start
#> parcel

#Server running at http://localhost:1234
Every time you change something inside src or related to src/index.tsx like index.css, it will rerun the quick build and store it in dist folder inside react app directory, as index.js and index.css.
Step 7 Now coming to the extension integration part, editing src/extension.ts
import * as vscode from 'vscode';

export function activate(context: vscode.ExtensionContext) {

	let webview = vscode.commands.registerCommand('react-ext.namasteworld', () => {

		let panel = vscode.window.createWebviewPanel("webview", "React", vscode.ViewColumn.One, {
			enableScripts: true
		})

		// web is for my react root directory, rename for yours

		let scriptSrc = panel.webview.asWebviewUri(vscode.Uri.joinPath(context.extensionUri, "web", "dist", "index.js"))

		let cssSrc = panel.webview.asWebviewUri(vscode.Uri.joinPath(context.extensionUri, "web", "dist", "index.css"))

		panel.webview.html = `<!DOCTYPE html>
		<html lang="en">
		  <head>
			<link rel="stylesheet" href="${cssSrc}" />
		  </head>
		  <body>
			<noscript>You need to enable JavaScript to run this app.</noscript>
			<div id="root"></div>
			<script src="${scriptSrc}"></script>
		  </body>
		</html>
		`
	});

	context.subscriptions.push(webview);
}

export function deactivate() { }
MOST IMPORTANT PROCESS!
Don't forget manually write all you registered command inside package.json, this will lead to absence of UI Options in the command palate Ctrl+Shift+P
To do so, go to your extension's root directory's package.json
{
...,
"contributes": {
    "commands": [
      {
        "command": "react-ext.namasteworld",
        "title": "React Web View"
      }
    ]
  },
}
Final Step Now, for the moment of truth
- Just press
Ctrl F5, another Extension Development will open. - On another test vscode editor Extension Development, open command palate by press
Ctrl+Shift+P - Search for your registered command, your given the name in
package.json, in my case React Web View
And similar window must pop-up as shown below
Expected Steps:
Fun Fact: You don't need to rerun after making changes inside your react app or App.tsx, reopen the window as shown below
Bonus: VS Code UI Toolkit (React)
Advantages of using frameworks instead of raw html, you can use UI libraries like shadcn ui, framer motion, and many more
One such useful example is there own developed Webview UI Toolkit
It is an amazing ui library which makes your made extension feels like their native once.
To implement you just need to install vscode/webview-ui-toolkit inside your react app
npm install --save @vscode/webview-ui-toolkit
Editing App.tsx
import {
  VSCodeButton,
  VSCodeDataGrid,
  VSCodeDataGridRow,
  VSCodeDataGridCell,
  VSCodeTextField,
  VSCodeProgressRing,
} from "@vscode/webview-ui-toolkit/react";

function App() {
  const rowData = [
    {
      cell1: "Cell Data",
      cell2: "Cell Data",
      cell3: "Cell Data",
      cell4: "Cell Data",
    },
    {
      cell1: "Cell Data",
      cell2: "Cell Data",
      cell3: "Cell Data",
      cell4: "Cell Data",
    },
    {
      cell1: "Cell Data",
      cell2: "Cell Data",
      cell3: "Cell Data",
      cell4: "Cell Data",
    },
  ];

  return (
    <div className="grid gap-3 p-2 place-items-start">
      <VSCodeDataGrid>
        <VSCodeDataGridRow row-type="header">
          <VSCodeDataGridCell cell-type="columnheader" grid-column="1">
            A Custom Header Title
          </VSCodeDataGridCell>
          <VSCodeDataGridCell cell-type="columnheader" grid-column="2">
            Another Custom Title
          </VSCodeDataGridCell>
          <VSCodeDataGridCell cell-type="columnheader" grid-column="3">
            Title Is Custom
          </VSCodeDataGridCell>
          <VSCodeDataGridCell cell-type="columnheader" grid-column="4">
            Custom Title
          </VSCodeDataGridCell>
        </VSCodeDataGridRow>
        {rowData.map((row) => (
          <VSCodeDataGridRow>
            <VSCodeDataGridCell grid-column="1">{row.cell1}</VSCodeDataGridCell>
            <VSCodeDataGridCell grid-column="2">{row.cell2}</VSCodeDataGridCell>
            <VSCodeDataGridCell grid-column="3">{row.cell3}</VSCodeDataGridCell>
            <VSCodeDataGridCell grid-column="4">{row.cell4}</VSCodeDataGridCell>
          </VSCodeDataGridRow>
        ))}
      </VSCodeDataGrid>

      <span className="flex gap-3">
        <VSCodeProgressRing />
        <VSCodeTextField />
        <VSCodeButton>Add</VSCodeButton>
        <VSCodeButton appearance="secondary">Remove</VSCodeButton>
      </span>
    </div>
  );
}

export default App;
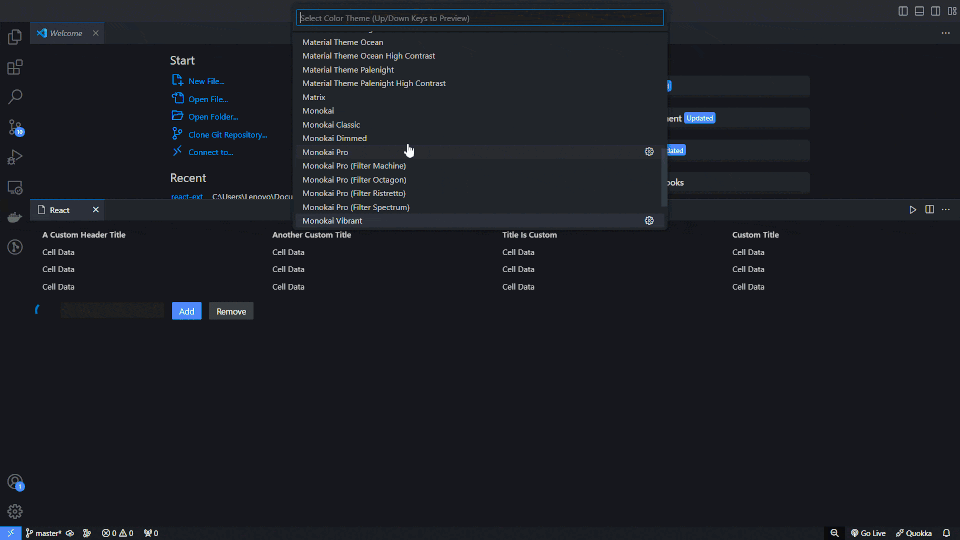
The best part of this library this is, it accommodates with every available themes in vscode, using their css varibles (i guess), which is amazing.
Here is a sample
For more usage info look into their Repo
If you are here, i don't believe you actually reached here, btw thanks for reading.
Here is a github link to my react setup repo, you can easily clone and try for yourself too. Clone Repo